Here is how to use a bedazzling kit, in one paragraph: sort the box, put down a glue dot about two-thirds the width of a stone, pick the stone up with the wax pencil, press it for two to three seconds, then leave the piece alone for 24 hours. Work in batches of eight to ten dots, never more.
That's the whole loop, repeated a few thousand times. A kit is just the bundled version of bedazzling: flatback stones, an adhesive, and two tools that make placing something 3 mm wide bearable.
What follows is the part the packaging skips. I've written it in the order you'll actually need it — box open, stones everywhere, no idea whether the glue in your hand is the right one.
Before you glue anything:
- Flip a stone over. Shiny, clean back = glue-on. Dull grey film = hotfix, and glue will not hold it.
- Check the size. Most cheap kits ship 3 mm resin, which lands between the SS10 and SS12 rows on a rhinestone size chart.
- Pick a hard-surface first project, not a t-shirt you love.
- Clear three days. Not three hours.
What's Actually Inside a Bedazzling Kit?
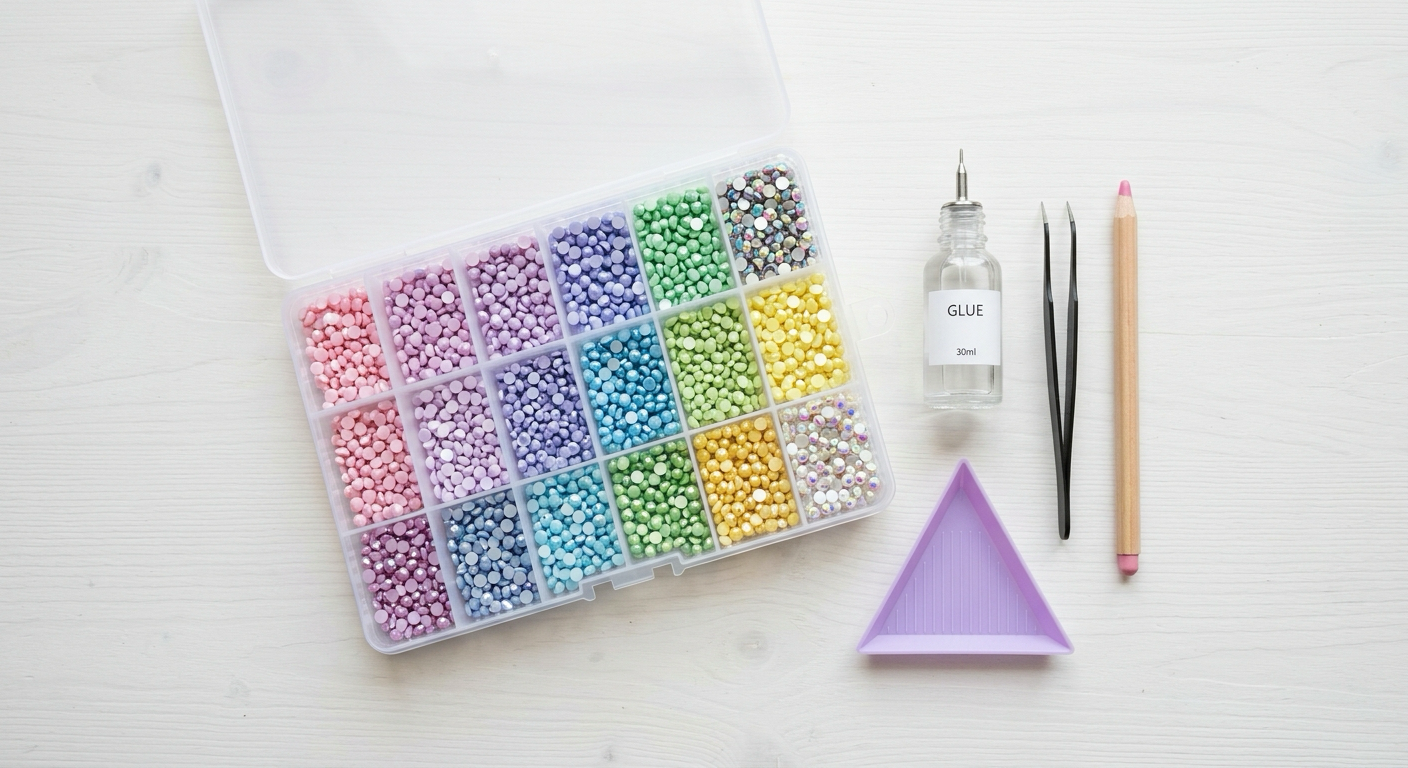
A standard kit from Amazon, Walmart or a craft store holds five things, and two of them usually arrive unlabeled.
| What's in the box | What it does | The part nobody explains |
|---|---|---|
| 20,000–30,000 flatback rhinestones | The sparkle, sorted by color into bags or a case | Almost always resin, almost always 3 mm |
| Tube of clear adhesive (B7000 or similar) | Bonds stone to surface | Solvent-based. It smells. Open a window |
| Wax pick-up pencil | Lifts one stone at a time by its top facet | The wax tip is consumable, not permanent |
| Fine-point tweezers | Nudging a placed stone, rescuing drops | Bent tips beat straight ones here |
| Shallow tray or dotting board | Holds loose stones face-up | Tilt it — stones self-right at the low edge |
Some kits add a scraper, tacky transfer tape, or a heat applicator wand. If a wand is in your box, your workflow changes completely — see the hotfix section below.
One thing that is not in a modern kit: a Bedazzler. If you searched how to use a bedazzler expecting a machine, you were thinking of the vintage hand-press that punched prong-set studs through fabric. Kits replaced the press with glue and flatbacks — no prongs to bend, no fabric to puncture, and you can stone hard surfaces the press could never touch.
Are the Rhinestones in Your Kit Resin or Glass?
Resin, almost certainly. Any kit selling tens of thousands of stones for under $20 is selling molded acrylic, and that single fact decides what your kit is good at.
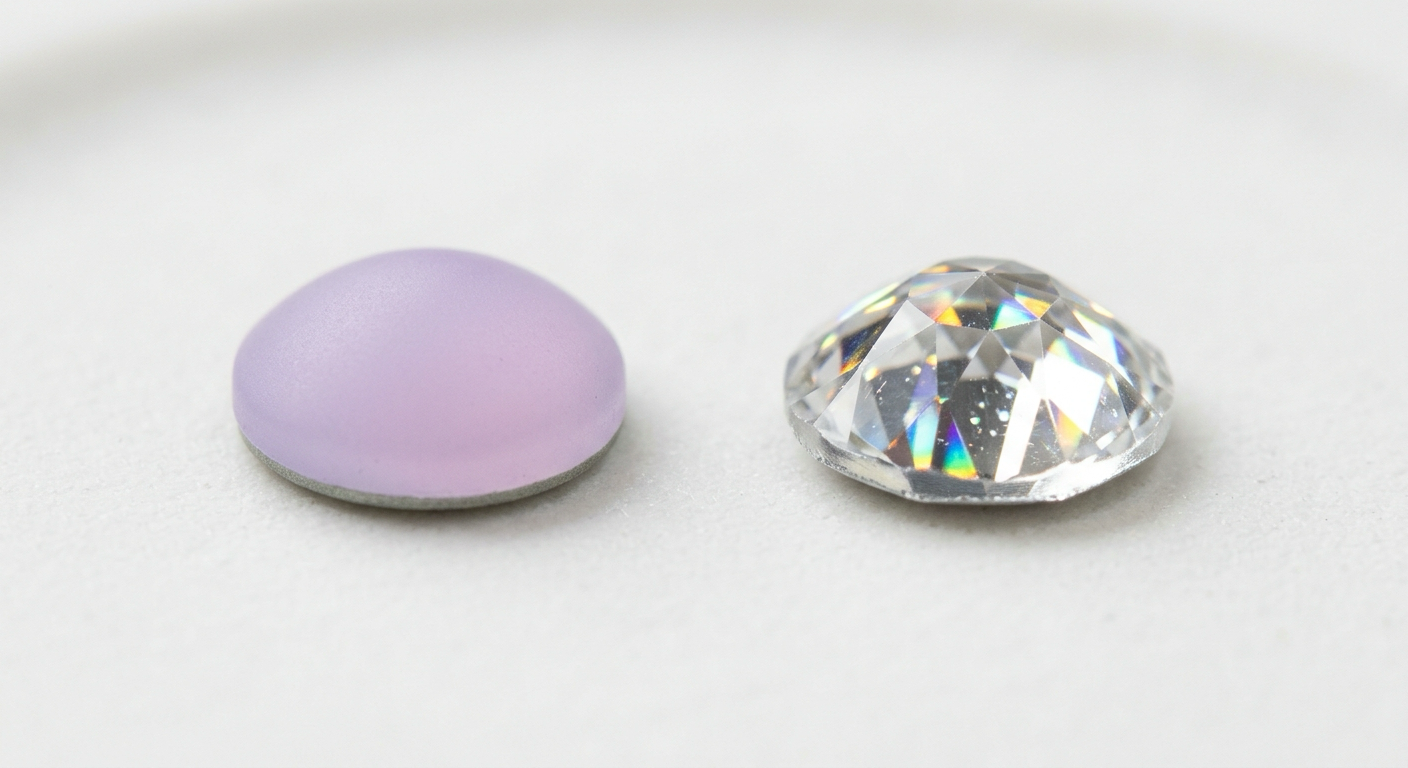
Resin stones (also sold as "jelly" or "acrylic") have molded facets and no foil backing, so they glow softly instead of throwing hard flashes. They're feather-light, they bounce instead of shattering, and they cost a fraction of glass — which has cut facets, a mirrored foil back, and runs roughly 3 to 10 times the price.
In practice: resin is excellent on tumblers, phone cases, frames, costume pieces and party décor, anything that never sees a wash cycle. It's weaker on clothing you launder repeatedly, because acrylic clouds and scratches where glass shrugs it off. The stones don't fail, the finish does.
Size next. Kit listings say "3 mm," which sits between SS10 (2.8 mm) and SS12 (3.1 mm) on a size chart. Plan with the SS12 figure — 65 stones per square inch at full coverage — then round your order up, because 3 mm packs very slightly tighter than SS12 does.
Hotfix or Glue-On: Which Stones Did You Get?
Turn a stone over and look at the back. A glue-on flatback is clean — smooth resin or bright silver foil. A hotfix stone carries a dull, milky grey patch of dry adhesive across its base.
Get this one wrong and nothing else matters, because the two types refuse each other's method. That milky coating is engineered to melt into fibres, and it blocks liquid adhesive — Beacon warns against gluing hot-fix crystals on its Gem-Tac product page, and the hotfix vs glue-on guide goes through the wording. The reverse fails too: an iron does nothing to a plain flatback except risk cracking it.
Nearly every cheap kit ships glue-on, and for a good reason — resin softens in the temperature band hotfix needs, so a wand would melt the very stones in the box. If your kit did include a wand, your stones are heat-rated and this page stops being the right guide: the temperatures, the timings, the fabrics that refuse to hold and the whole wand-versus-glue decision live in hotfix vs glue-on rhinestones.
One number worth carrying over: with an iron rather than a wand, the band is 170–180 °C (338–356 °F) for 10 to 35 seconds by stone size, always through a press cloth.
How to Use a Bedazzling Kit's Pick-Up Pencil
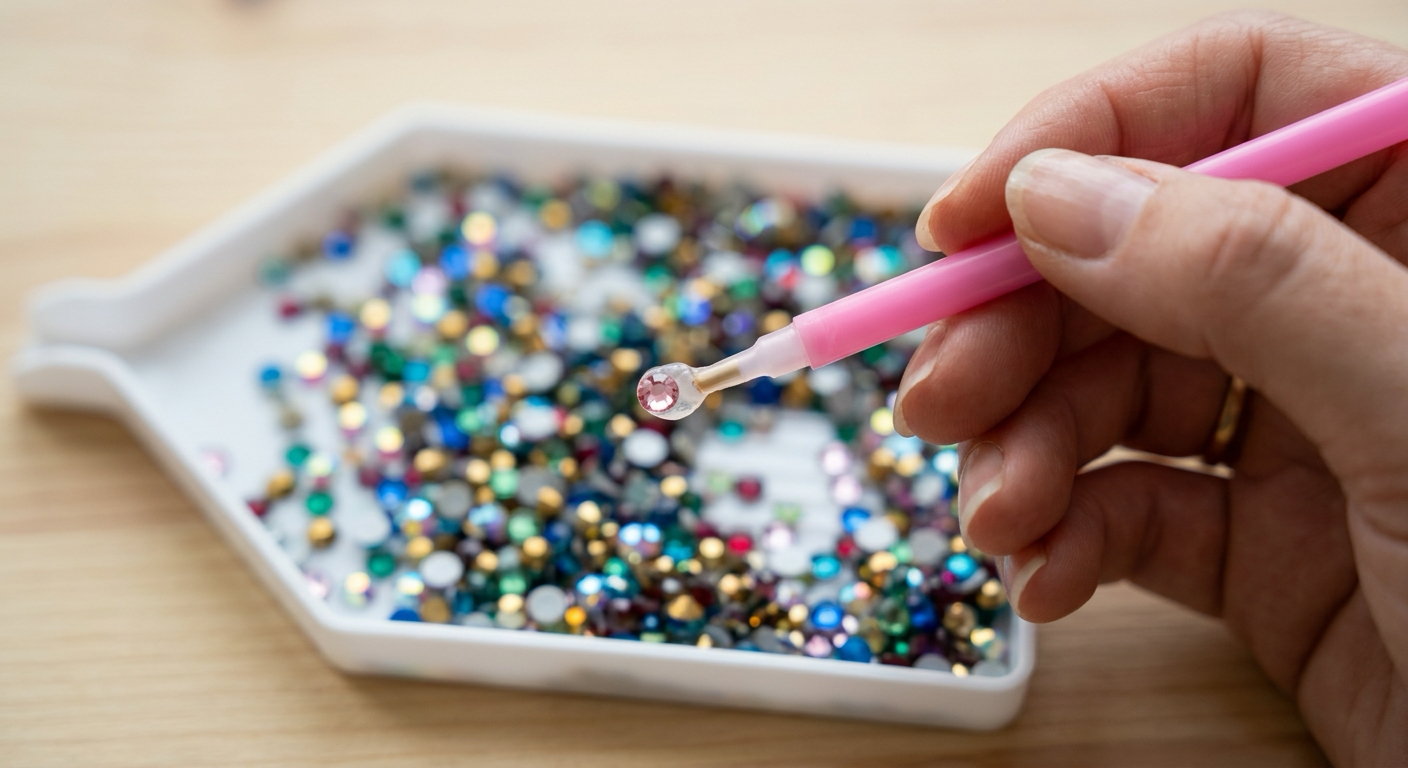
This is the tool people misunderstand and then abandon, and it is the one piece of kit hardware worth a section of its own. It's not tape and it's not a magnet — it's a soft wax tip that grips a stone's top facet just hard enough to lift it, and lets go the instant the glue underneath grips harder.
Touch the tip straight down onto the top facet, lift, carry it to your glue dot, press the stone down, then pull the pencil straight up. The transfer happens on its own. Never twist.
Two failure modes, both fixable in seconds. If the tip stops picking up, it's glazed with dust and residue — pare a sliver off with a craft knife to expose clean wax. If stones cling to the tip after placement, your dot is too small or has already skinned over.
The tweezers are for rotating a stone that landed off-angle and fishing one out of a tray corner. Mine mostly sit unused until a stone goes somewhere it shouldn't.
The Placement Rules That Decide Everything
Kits ship the stones and the glue, never the technique, so here is the compressed version — the complete step-by-step method covers each of these surface by surface.
- Dot size: about two-thirds the stone's diameter. Pressing squashes it out to the edge. Full-width dots dry as a frosty halo.
- Batch size: 8 to 10 dots, place, then the next set. E6000's maker states it gets tacky in about 2 minutes and begins setting in about 10, and B7000 behaves the same. Skinned glue is why stones vanish in month two.
- Pressure: 2 to 3 seconds of straight-down contact per stone.
- Direction: outline first, fill inward, so your hand never lands in wet glue.
- Cure: B7000 24 to 48 hours, E6000 24 with full strength at 72, Gem-Tac dry at 1 hour and cured at 24 but hand wash only, Fabri-Fuse 8 hours flat and machine washable at 72. Touch-dry is not cured.
The one kit-specific trap in that list is the glue. B7000 is what most boxes ship, it is solvent-based, and it is not a laundry adhesive — anything headed for a washing machine needs Fabri-Fuse bought separately, before you start. If you are unsure what is in your tube, which glue holds on which surface sorts it out, including how many tubes 30,000 stones actually take.
What Should You Bedazzle First?
Something flat, hard, cheap and unwashed. A phone case, a plain tumbler, a picture frame, a pair of thrifted sunglasses.
Hard surfaces forgive beginners. They don't stretch, they don't absorb glue, they don't need cardboard inside them, and a spacing mistake ruins a $6 case instead of a favorite shirt. You learn the dot-size feel in about twenty stones, and that transfers to everything after.
For fabric, a t-shirt is the right second project, with placement maps in the shirt guide. Save the graduation cap for after both, since it pairs a hard deadline with a lot of cameras. Still deciding what to bedazzle? Here are things worth bedazzling, sorted by difficulty.
Do 30,000 Rhinestones Go as Far as You Think?
No, and this is the number that surprises everyone. At 65 stones per square inch, a 30,000-stone kit covers roughly 460 square inches — a 21-inch square, or about the size of a hand towel. At a realistic pace of 250 to 300 stones per hour, laying all of them would take 100 to 120 hours of actual placing.
Per project, at that same SS12 density, with the standard 20% order buffer:
| Project | Area | Stones at 3 mm, full coverage | Buy with 20% buffer |
|---|---|---|---|
| Phone case back | 16 sq in | ~1,040 | ~1,250 |
| T-shirt chest area, edge to edge | 30 sq in | ~1,950 | ~2,340 |
| 20 oz tumbler wrap | 64 sq in | ~4,160 | ~5,000 |
| Graduation cap top | 80 sq in | ~5,200 | ~6,240 |
Two footnotes on that table. A scattered t-shirt design needs nowhere near 1,950 — the shirt guide budgets 300 to 600 for a chest motif, because scatter coverage is roughly a quarter of edge-to-edge. And a cap in larger SS16 stones lands near 3,200 rather than 5,200; smaller stones mean more of them for the same area.
So a 30,000-stone kit is about seven covered tumblers, not the lifetime supply the packaging suggests — and that's before color sorting, the real constraint. Split across ten colors, you have 3,000 of each, and one single-color tumbler already eats more than that. Run your surface through the rhinestone calculator before committing to a design, and set 20 stones aside per project as spares.
What the Kit Box Doesn't Tell You
Five things that go wrong specifically with kits, as opposed to bedazzling in general.
- The included nozzle is too wide for 3 mm stones. Kit tubes are built for general craft use. A precision needle tip costs a couple of dollars and turns guesswork into placed dots.
- Solvent glue needs ventilation. B7000 and E6000 fumes are unpleasant in a closed room. Window open, or work outside.
- Nobody sorts the stones first. Mixed-color kits arrive as a jumble in shared bags, and sorting into a compartment case saves more time than it costs.
- Resin stones and heat don't mix. No irons, no hot cars, no tumble dryers. The stones deform before the glue fails.
- The tray is the workflow. Pour a small pile, tilt the tray toward you, and stones settle face-up along the low edge where the pencil can reach them. Working straight from the bag is why people say pick-up pencils don't work.
If I could add one line to every kit box, it would be the third one. Sorting is unglamorous and everybody skips it, and then every project after that starts by digging through a bag of thirty thousand mixed stones for the eleven blue ones you need.
FAQ
What size are the rhinestones in most bedazzling kits?
Around 3 mm, which falls between SS10 (2.8 mm) and SS12 (3.1 mm) on a standard chart. Plan with the SS12 figure of 65 stones per square inch at full coverage. Some kits mix two or three sizes, which is genuinely useful — varied sizes read as intentional design rather than a flat grid of identical dots.
Are cheap bedazzling kits actually worth buying?
For hard surfaces, yes — the stones and tools cost less than buying the pieces separately, and resin looks good on a tumbler or a case. For clothing you wash weekly, the economics flip: the glue in the box is not laundry-rated and resin clouds with repeated washing, so you end up buying proper adhesive and glass stones anyway.
Why has my wax pick-up pencil stopped picking up stones?
The wax tip has glazed over with dust and adhesive residue, which is normal wear rather than a defect. Shave a thin sliver off with a craft knife to expose fresh wax, or press the tip into a spare wax block. If stones cling to the pencil after placement instead, your glue dot is too small or has already skinned over.
Do you need anything that isn't in the kit?
Three cheap additions cover almost every gap: a precision needle tip for the glue tube, cardboard or a silicone mat to slide inside garments, and rubbing alcohol for prepping hard surfaces. A chalk or heat-erase marking pen helps once you move past scattered designs. Nothing expensive, and no machine of any kind.
Knowing how to use a bedazzling kit comes down to four decisions the box leaves out: sort before you start, check whether your stones are hotfix or glue-on, keep the dot at two-thirds, and give it three days. The rest is patience and a tilted tray.
Where to Go Next
- 27 Bedazzle Ideas — if you are still staring at the box wondering what to put stones on
- Rhinestone Calculator — enter your surface, get the number to order
- How to Bedazzle: The Beginner's Guide — every step in full, once the kit stops being the limit
- Hotfix vs Glue-On Rhinestones — the guide to read if your box came with a wand
- How to Bedazzle a Shirt — when you are ready to risk fabric
- Rhinestone Calculator — how many stones your surface actually needs